Hexa AI is an AI-powered audience analytics solution for face detection and demographics, providing users with actionable insights on footfall, demographics, and audience engagement. It can function independently as a standalone AI tool or integrate seamlessly with your digital signage system.
Hexa AI - Standalone
Before installing Hexa AI on your screen, ensure the camera is installed.
- If the device has a built-in camera, it will be auto-detected.
- For a USB camera, connect it before installation and verify that it is recognized by the screen.
For optimal performance of Hexa AI, consider the following minimum specifications:
Camera Specifications:
- Resolution: A 1080p (Full HD) camera is recommended.
- Frame Rate: The camera should support a minimum of 10 frames per second (FPS).
AI Device Specifications:
- Processor: Minimum 4-core or higher.
- Memory: At least 4 GB RAM.
- Operating System: Android 13+ (64-bit)
Step 1 - Download the APK
On the device
Note: The APK file is larger than 1 GB. Please ensure you have a stable internet connection and sufficient storage space on your device before downloading or installing.
Press on the following link to download the APK DOWNLOAD APK
Go to Downloads and find the apk or Press on the downloaded apk dialog that appears after download end to Install.
From a Computer
- Or on a computer, click on the following link to download the APK: DOWNLOAD APK
- Copy the apk file to the device.
- Press on the apk to Install.
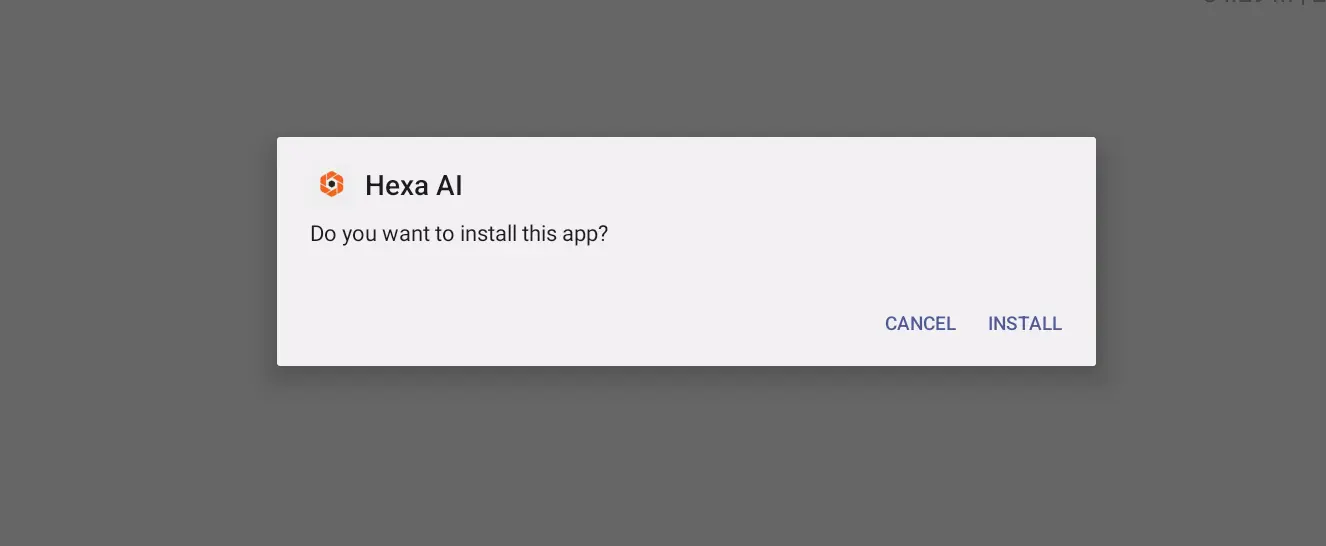
Step 2 - Install Hexa AI
- Press on INSTALL to start Installing Hexa AI
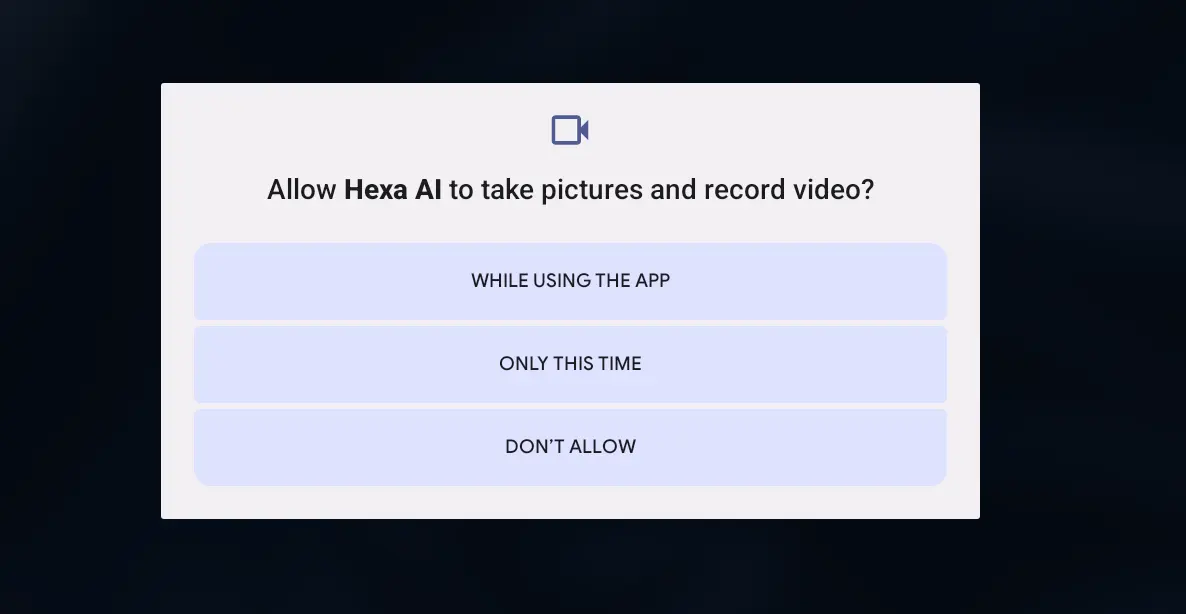
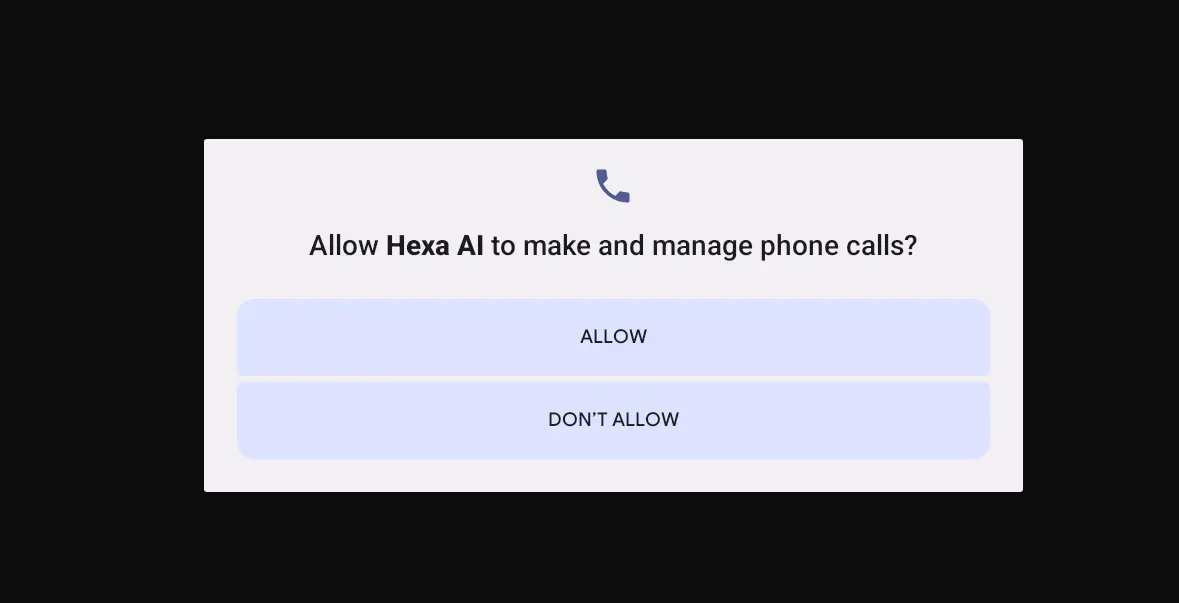
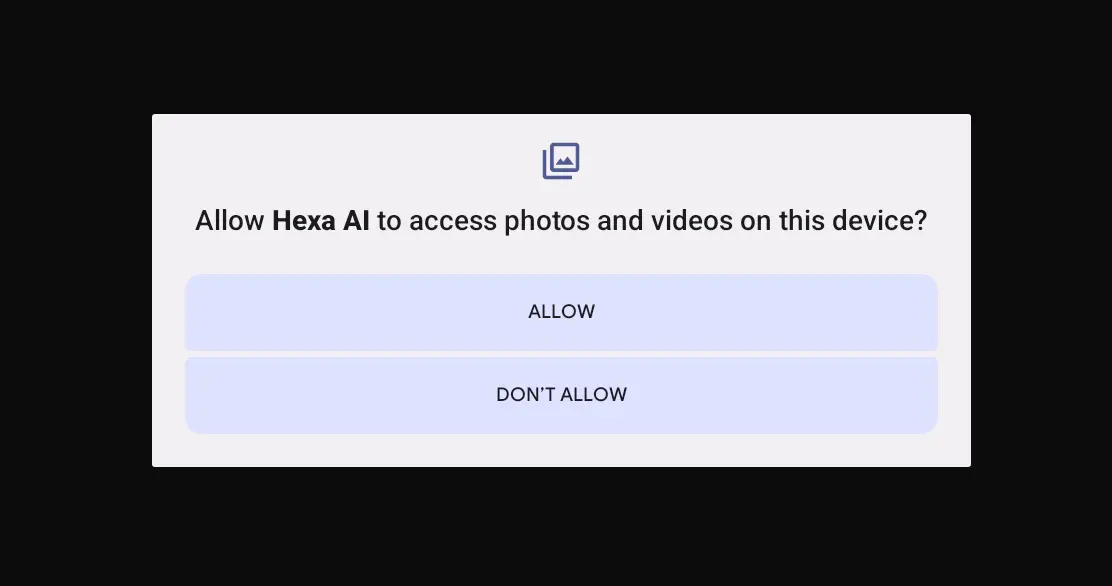
Step 3 - Allow Permissions
- When this dialog appears, click on WHILE USING THE APP to allow Hexa AI to take pictures and record video.
- Click on ALLOW.
- Next, click on ALLOW.
Step 4 - Display Hash Code
- Wait for a few seconds, the hash code will appear on the screen.
- Now, you can use this hash code to add your screen from the management console.

Step 5 - Add AI Screen
- Open the management console on your computer, and navigate to the SCREENS page.
- Go to the AI DEVICES section.
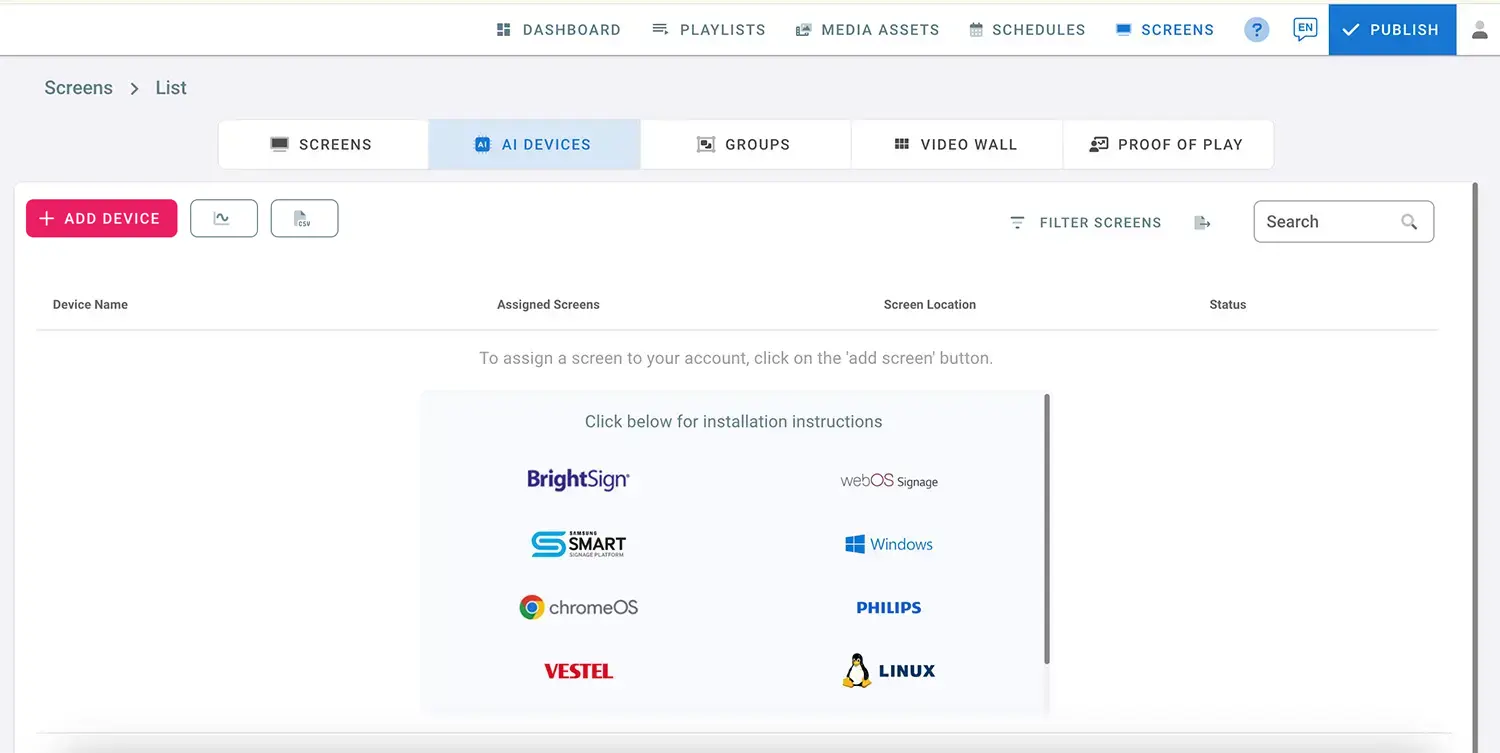
Note: A license must be purchased before adding the AI device. Please contact support or sales to acquire the license.
- Click on ADD DEVICE.
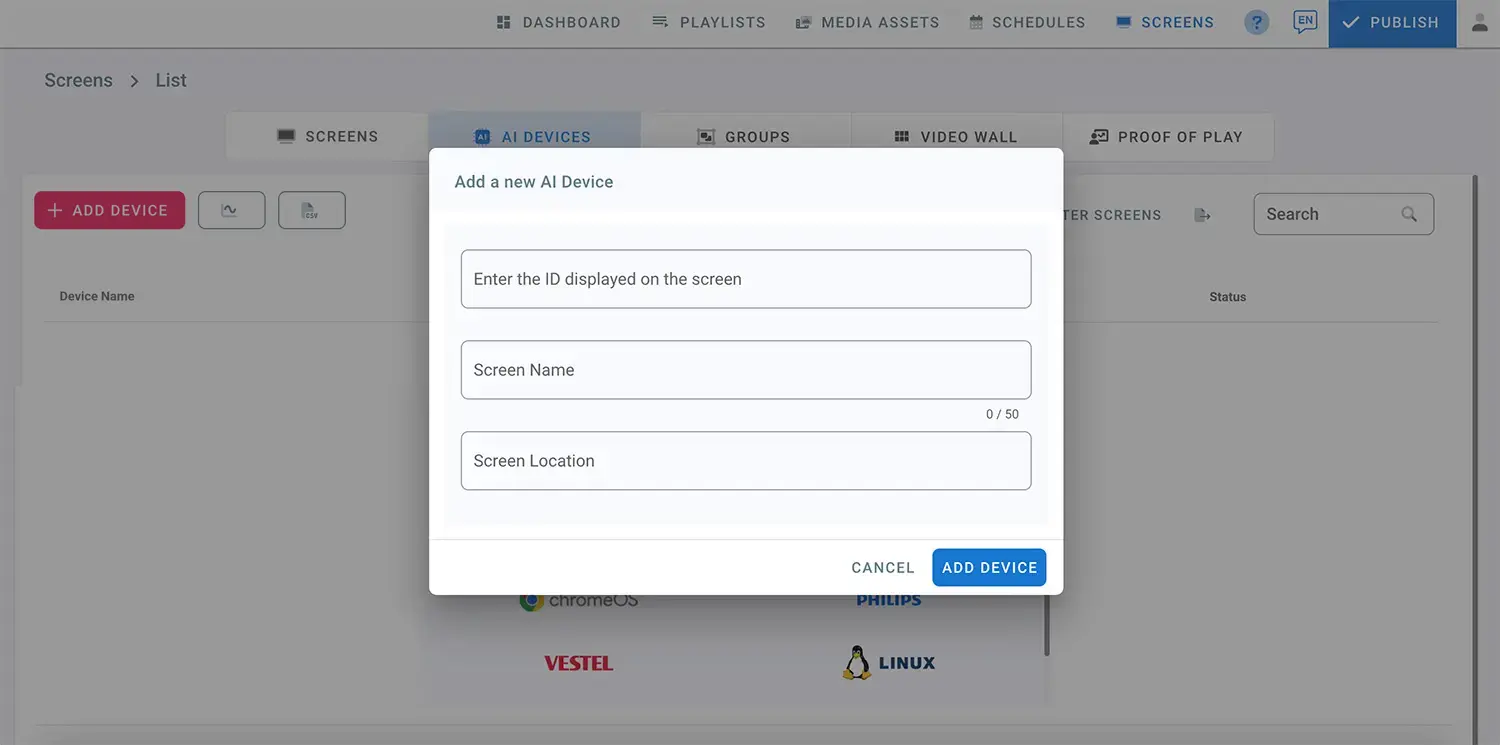
- Enter the hash code displayed on the screen from the previous step.(The hash code is case sensitive)
- Enter the screen Name and the screen location.
- Click on ADD DEVICE button to add the screen.
- The AI device will be added to the list, and the screen camera will activate to detect faces and demographics.
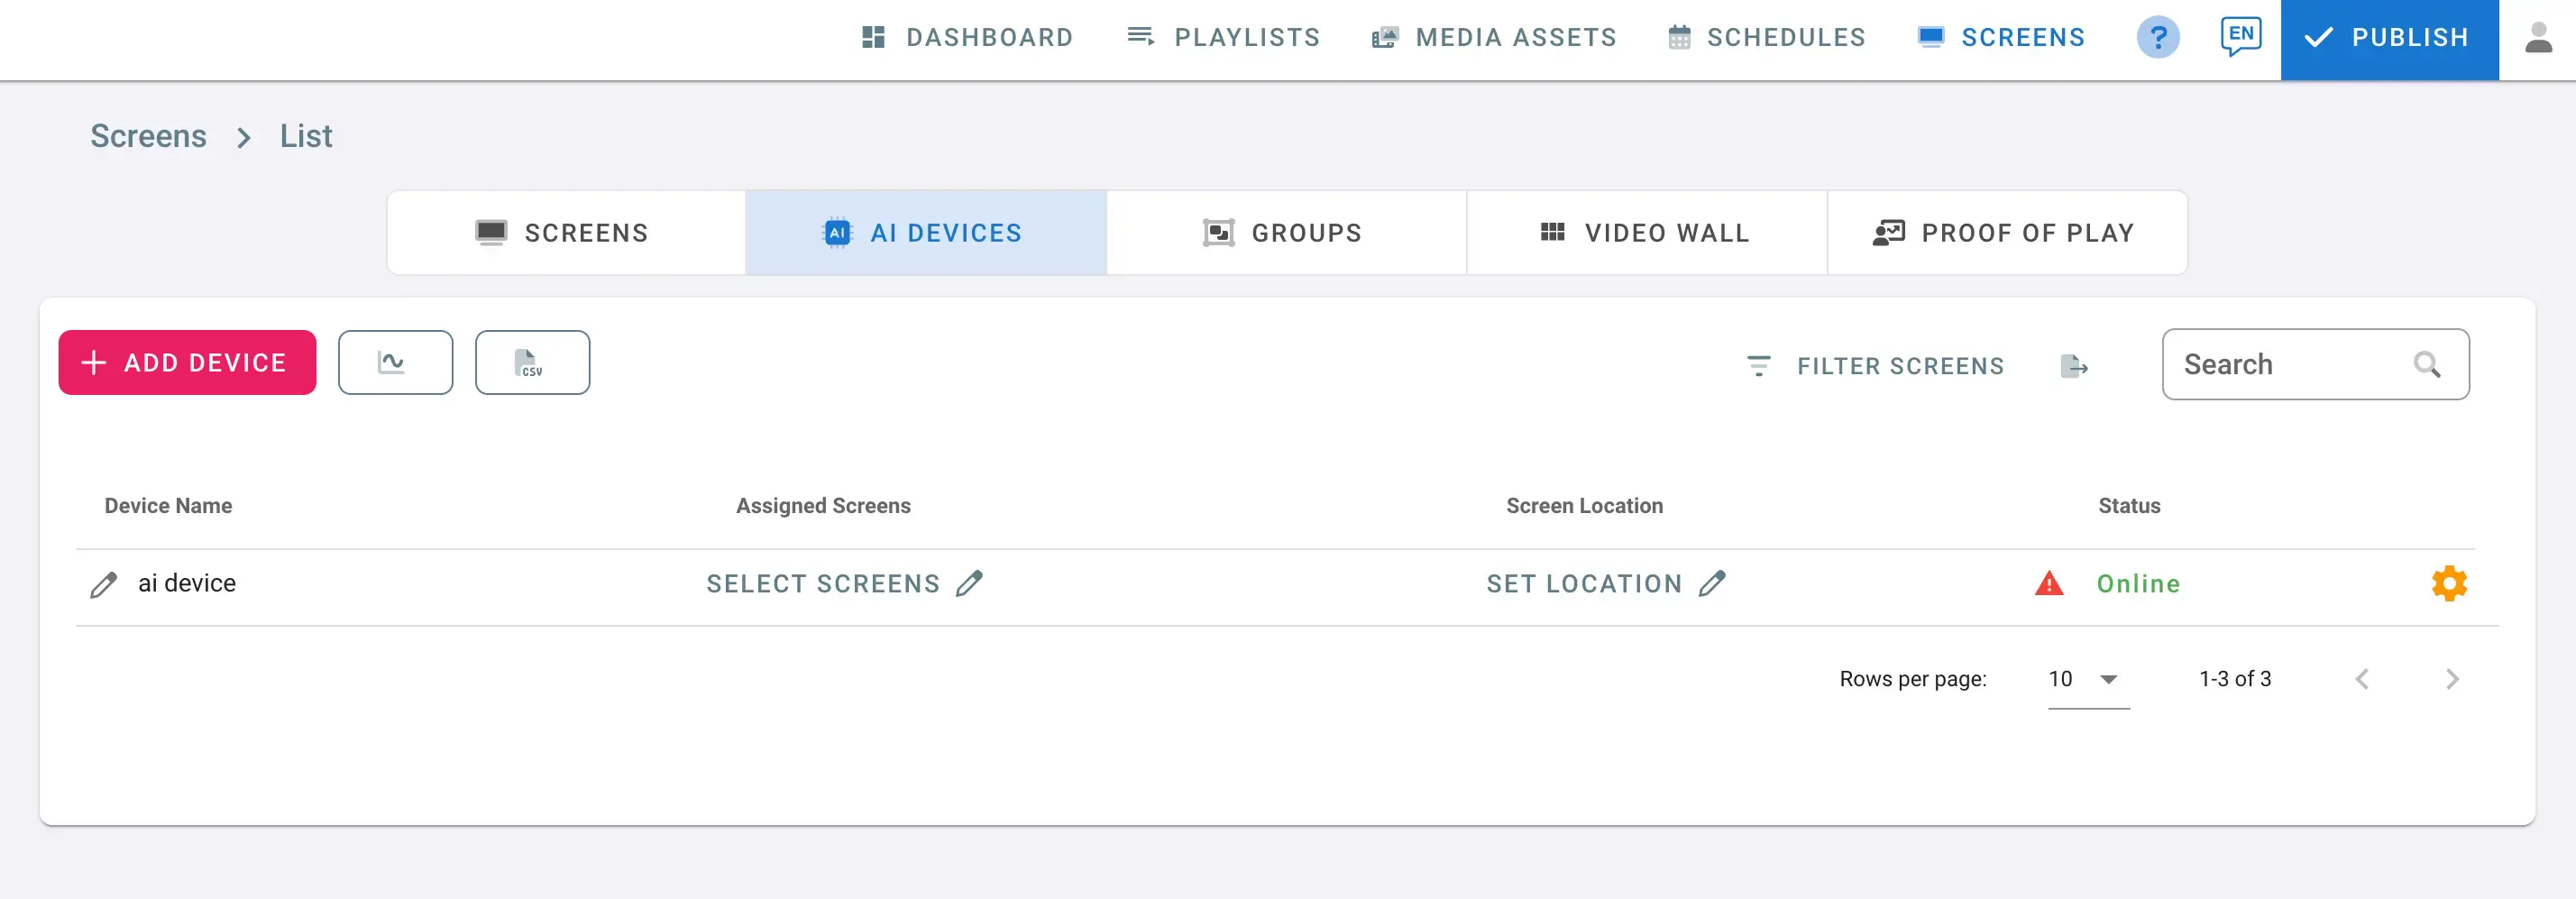
Note: A red triangle will appear next to the screen status during the first 15 minutes of reading and collecting data; ensure it disappears after 30 minutes.
Now that the AI device is added to the management console, you can begin collecting data and analytics.
Hexa AI with Digital Signage
Note: To use Hexa AI with Digital Signage, first install the Hexa AI app before installing the Digital Signage app on your screen.
To use Hexa AI with Digital Signage, follow the below steps:
- Navigate to the screens page.
- Add a digital signage screen in the SCREENS section; refer to Add Screen for more detailed instructions.
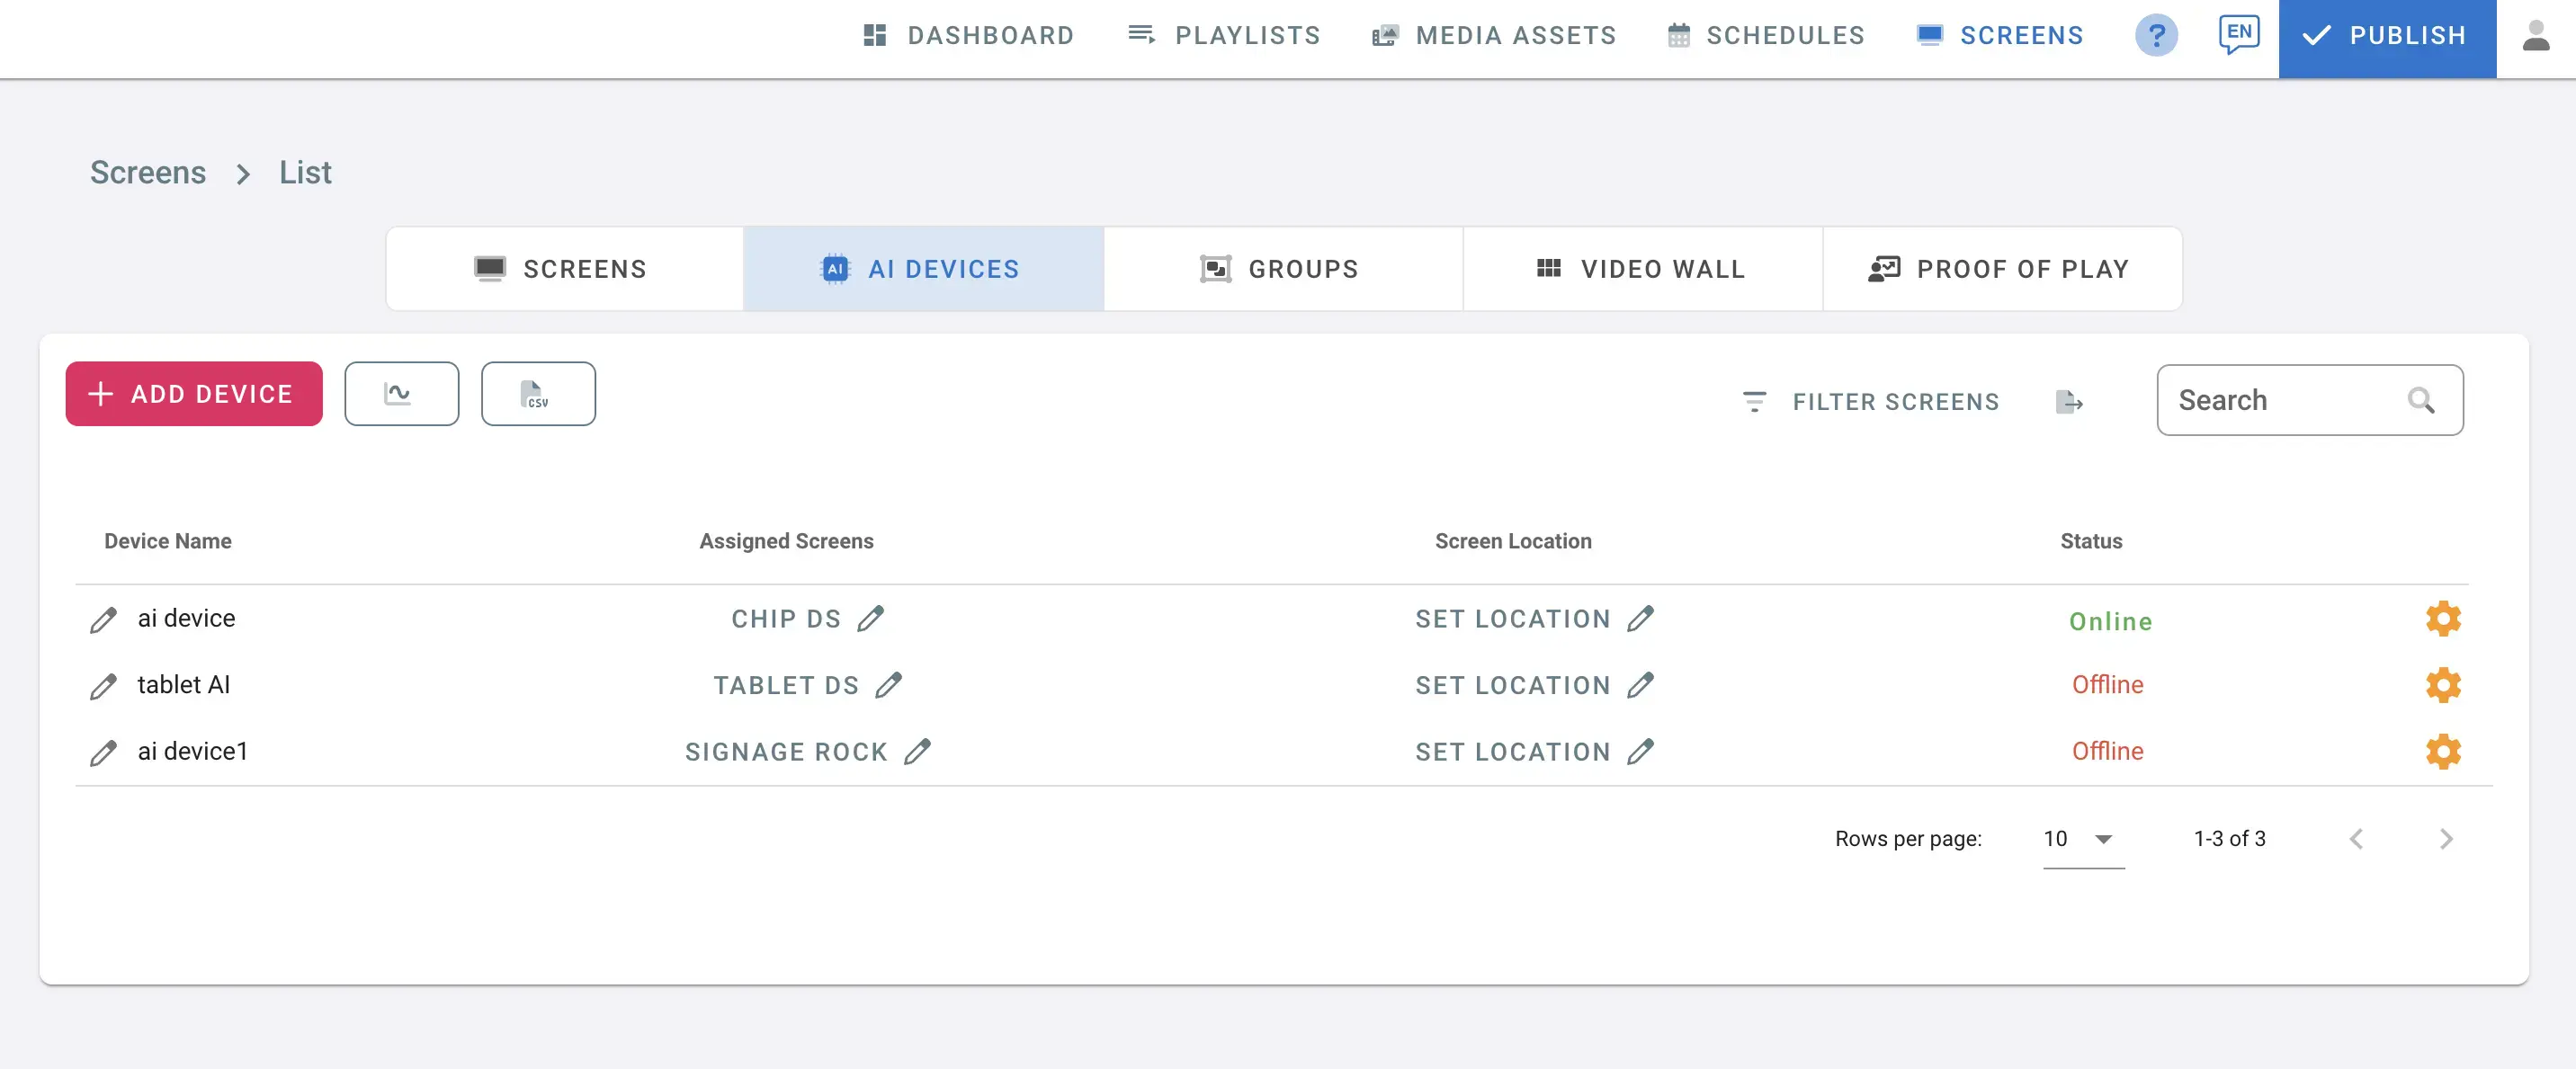
- After adding the digital signage screen, go to the AI DEVICES section and you can find your AI device in the devices list.
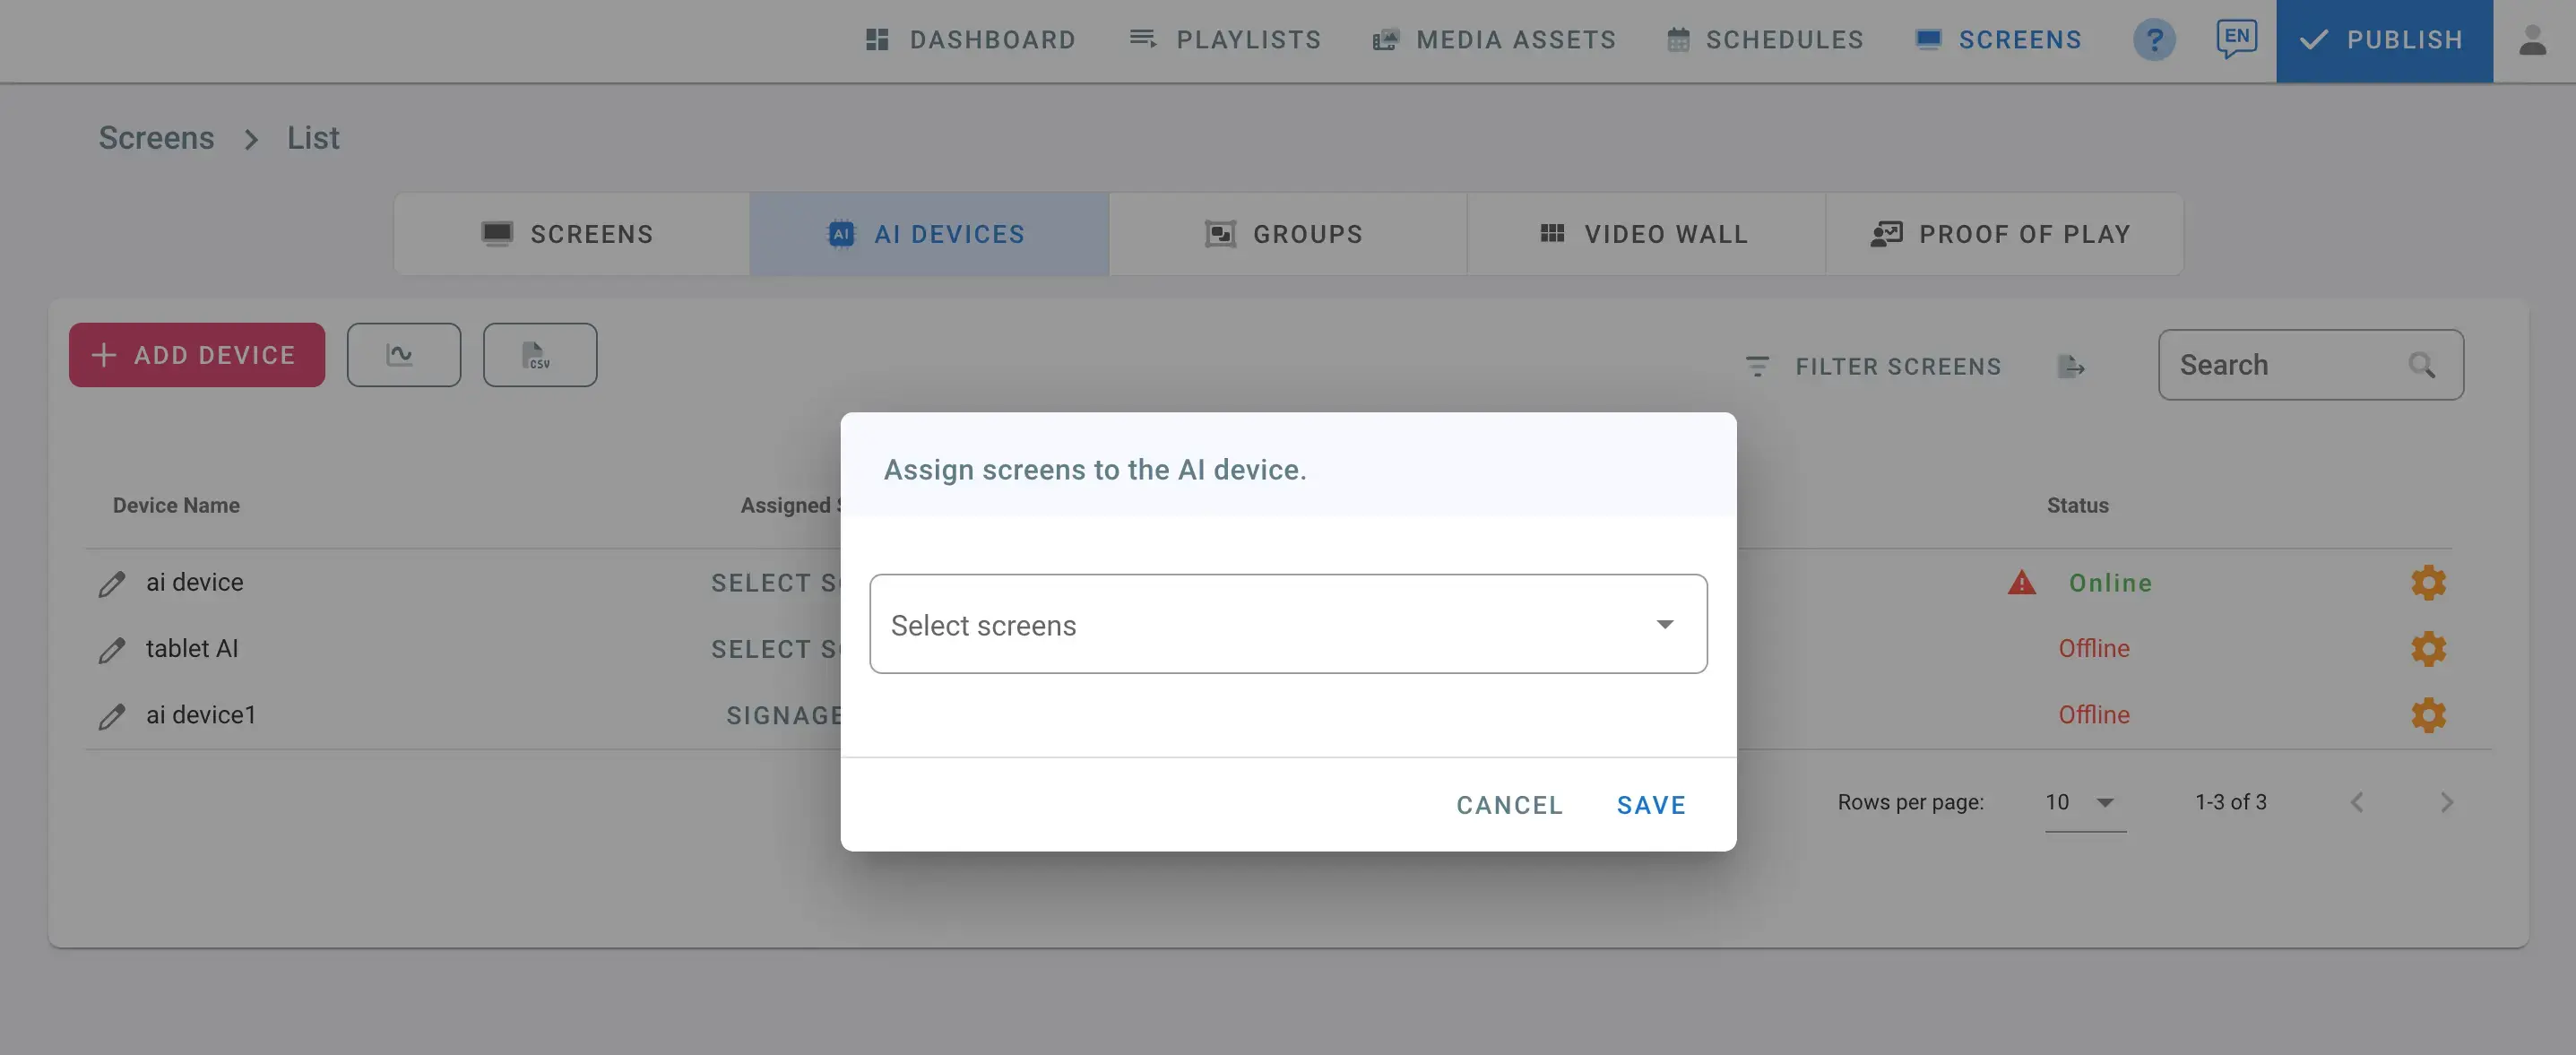
- In the Assigned Screens column, click on SELECT SCREEN.
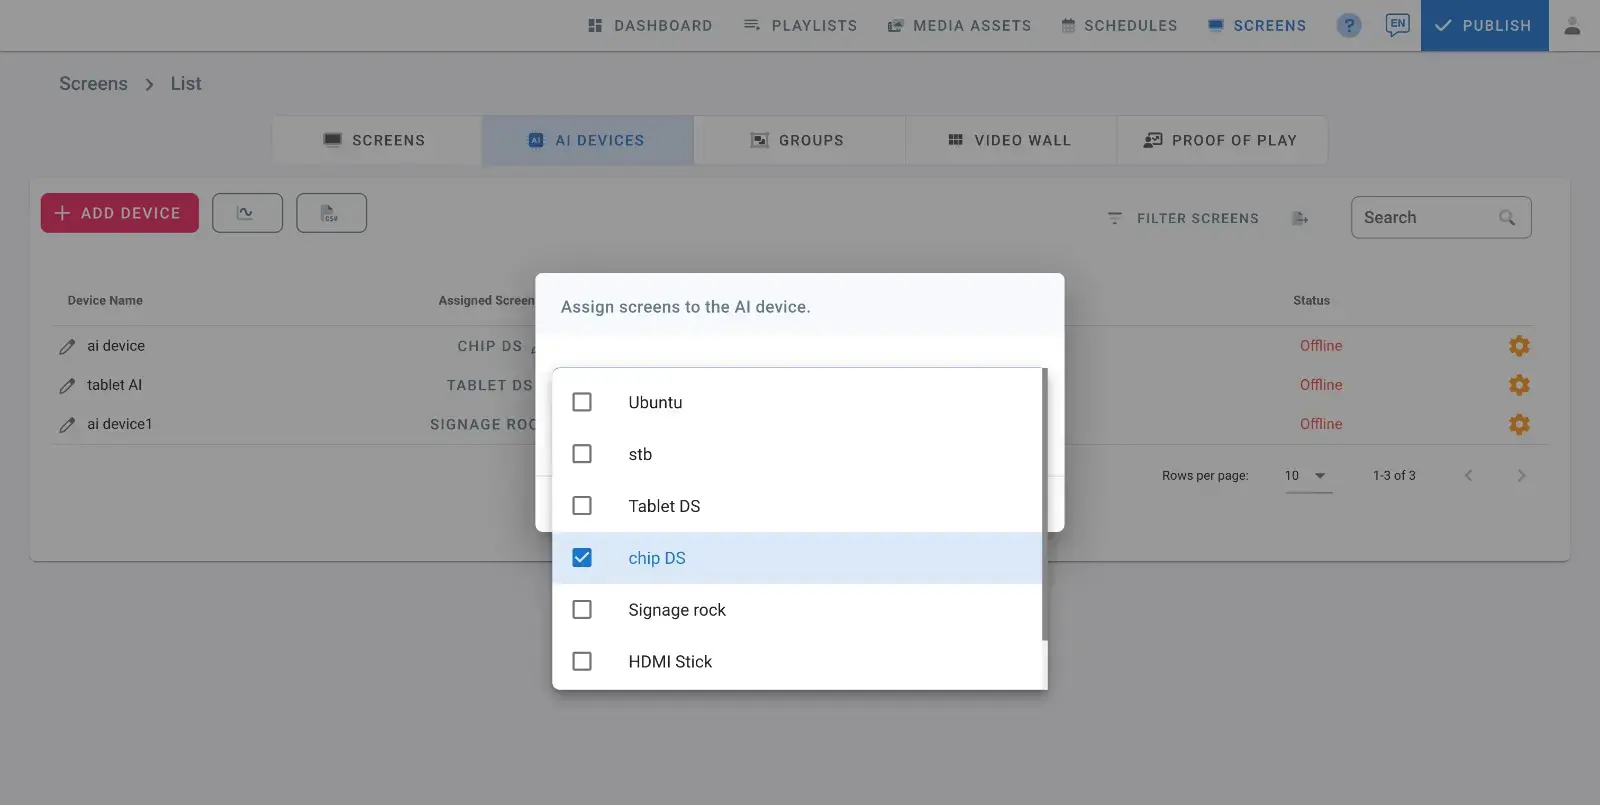
- From the drop-down list, select the digital signage screen to assign it to the AI device.
Now, Digital Signage and the AI device work together seamlessly through intelligent integration. This system combines real-time audience insights collected by the AI with precise proof-of-play data from the digital signage. The result is AI-powered content delivery and advanced viewership analytics that go beyond basic impressions.
With this synergy, you can identify which content captures attention, resonates with your target audience, and drives meaningful engagement—enabling you to optimize campaigns and maximize the impact of your digital signage strategy.
Hexa AI Dashboard
The Hexa AI Dashboard provides easy-to-read data reports on audience demographics, enabling real-time tracking and measuring your digital signage ad effectiveness.
To access the Hexa AI dashboard:
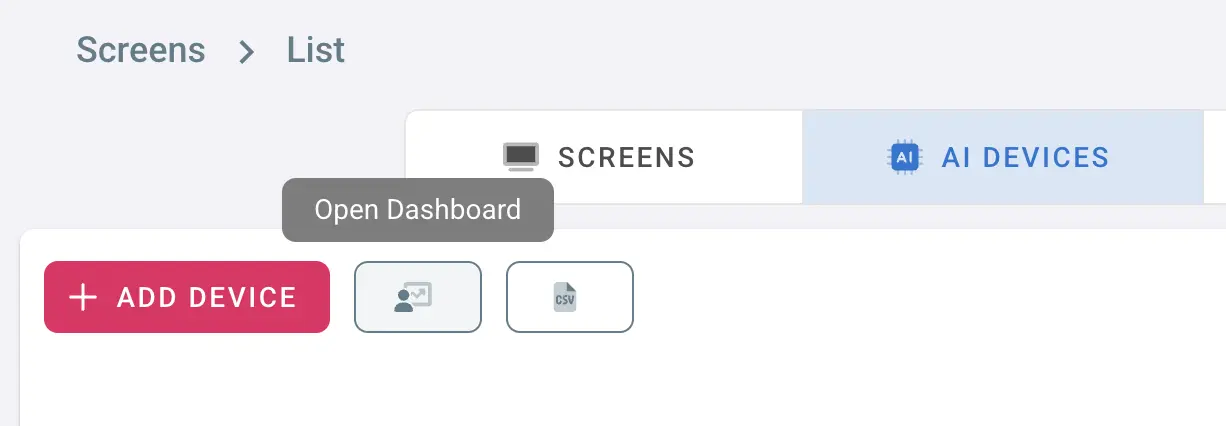
- Go to the “AI DEVICES” tab.
- Click the “Open Dashboard” button next to “Add Device”.
- The dashboard will open in a new tab.
- In the Filters section, the “Account” field displays your account address. If you manage multiple accounts, you can switch to another account from this field.
- Select a date to view the report.
Filters (optional):
- In the “Players” field, choose a specific player to see its data for the selected date.
- In the “Media Files” field, select a specific media file to view its data in the report.
- In the “Tags” field, select a specific tag to view its data in the report.
Note: if there’s no data available in the report, the Players, Media Files, and Tags field will not show.
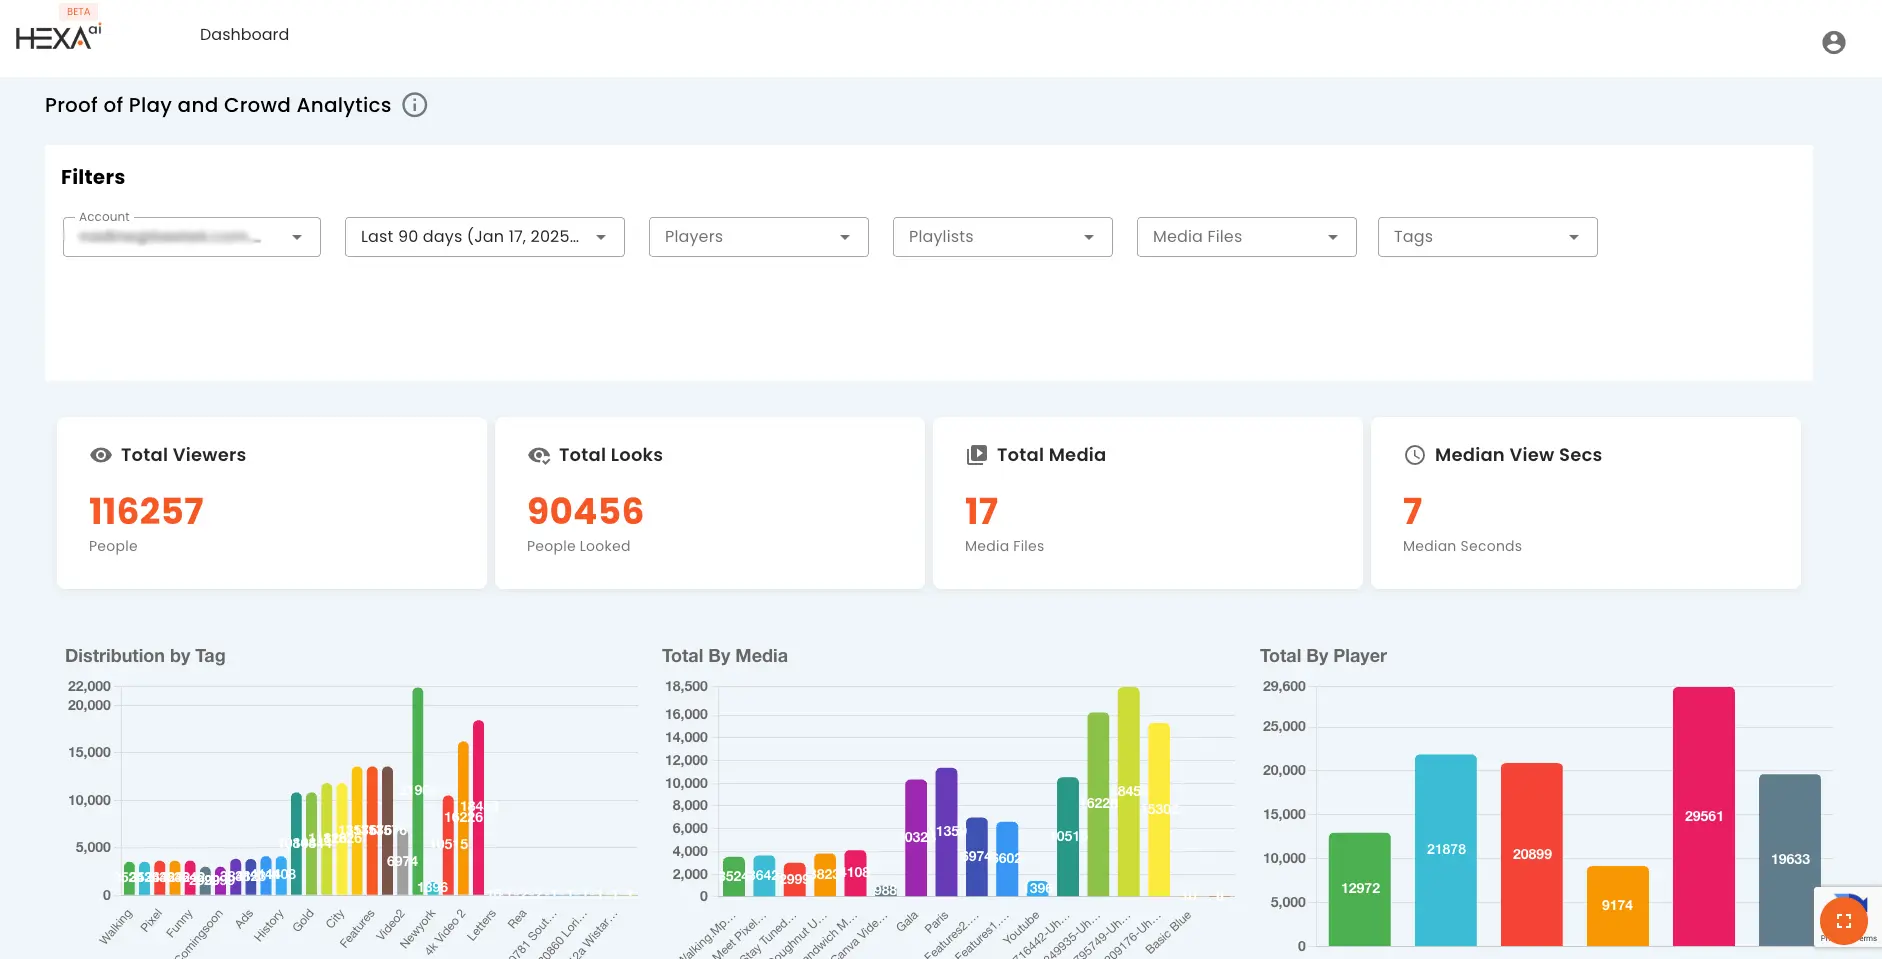
- You can click the Toggle in the bottom right corner for a fullscreen view.
Back to AI Devices page, to download the AI data report, click the “Download AI Data” button located next to “Open Dashboard.” This will provide you with the proof of play report in a CSV file format.
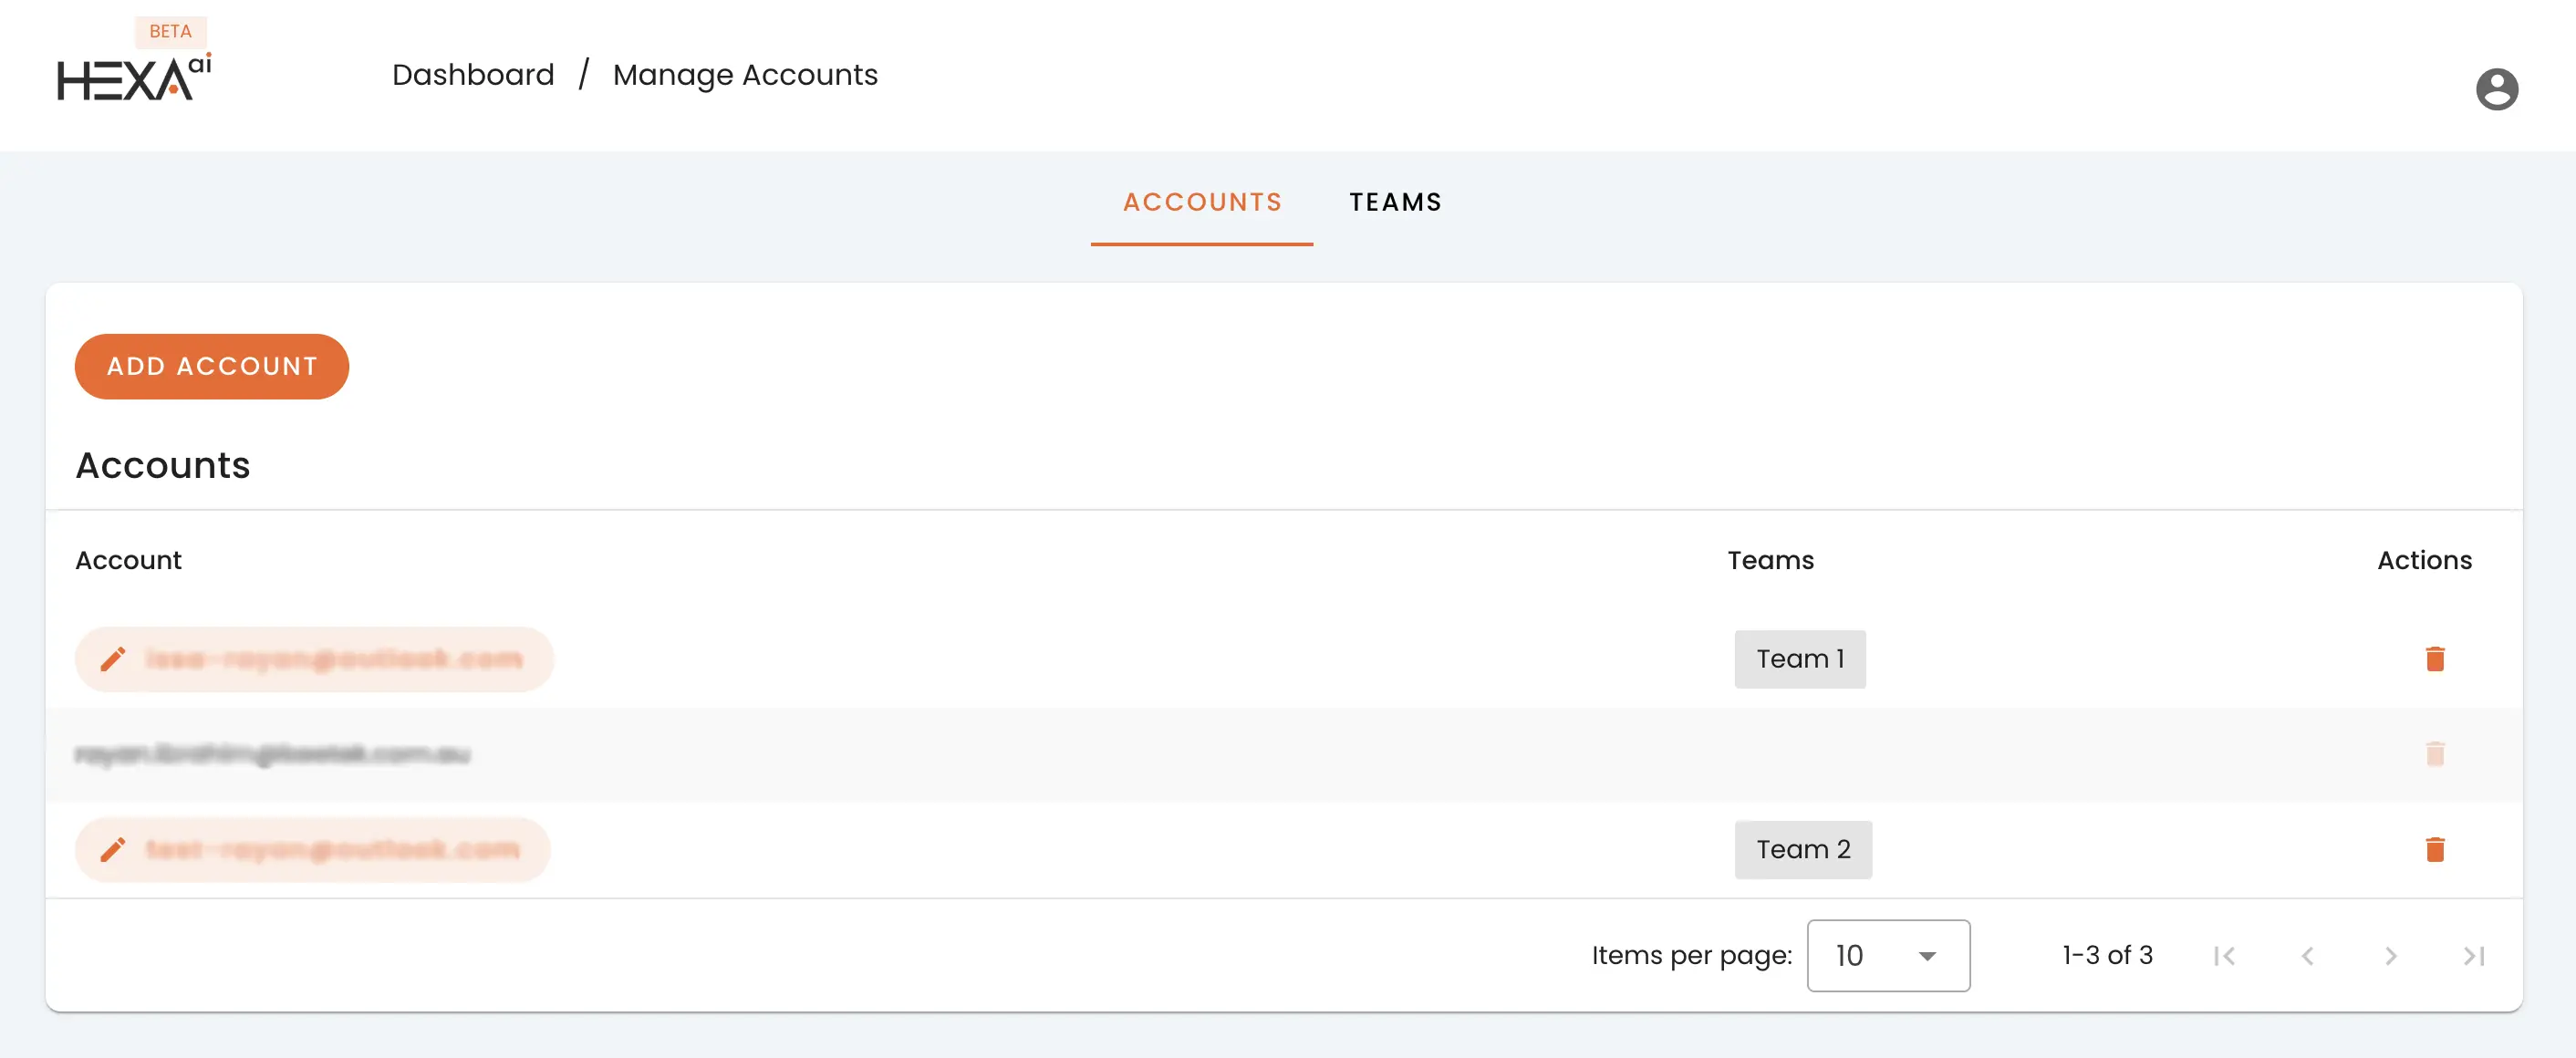
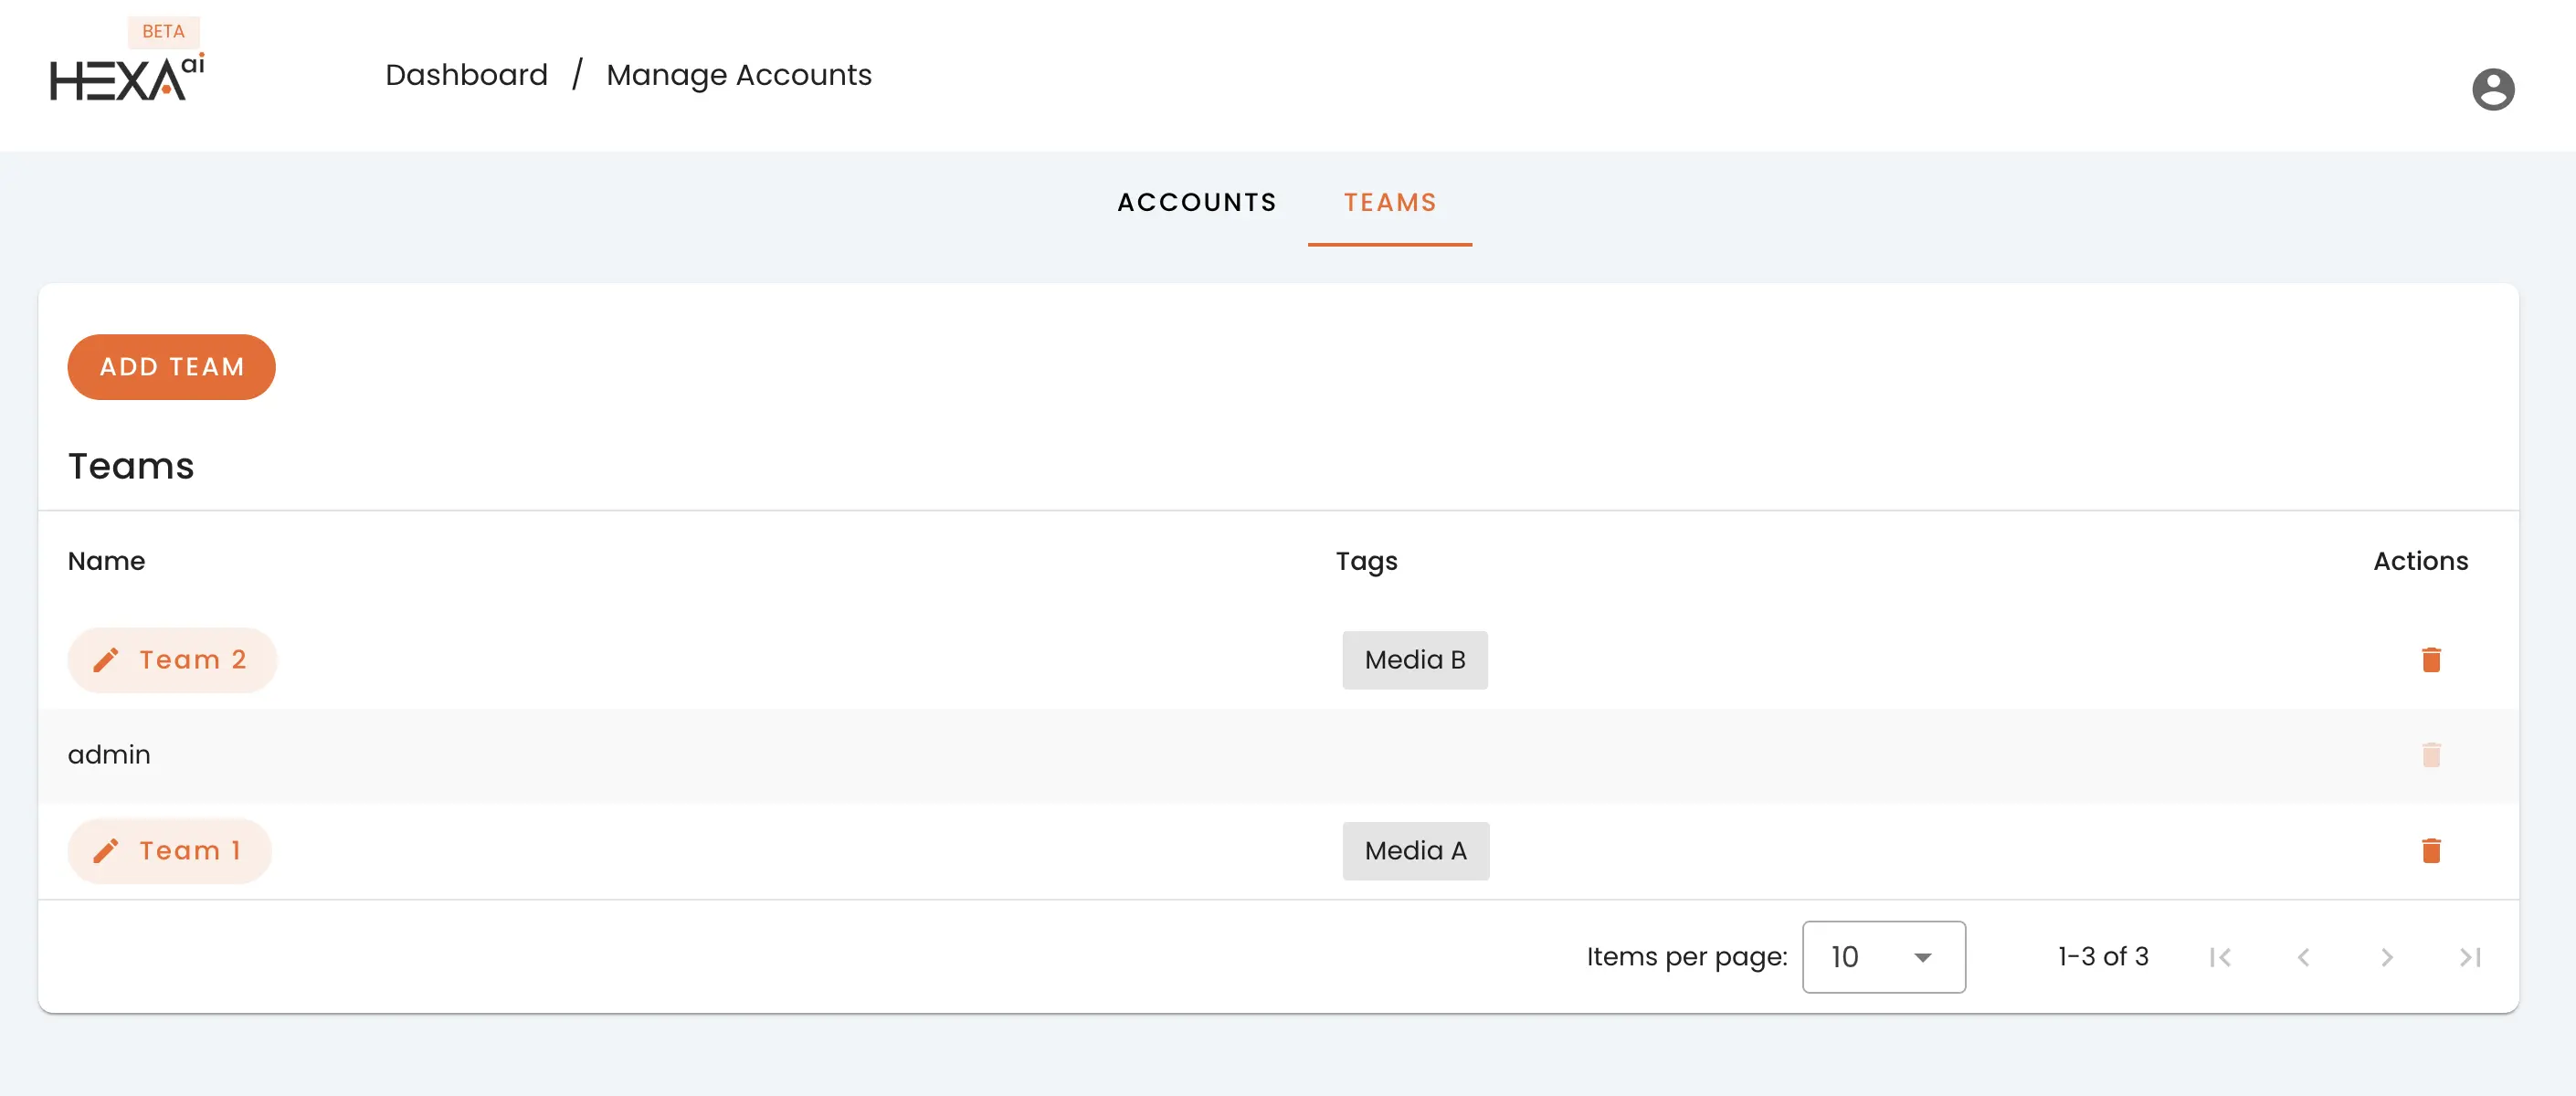
Manage Accounts
In this section, you can manage your dashboard by adding accounts, creating teams, and assigning these teams to specific accounts for access and control.
- Click the profile icon in the top right corner.
- Select Manage Accounts.
- Navigate to the Teams tab and click “Add Team”.
- Enter the Team name and relevant media tags for this team to access.
If no tags are assigned, the accounts in this team can have full media access.
- Now, navigate to the ACCOUNTS tab and click “Add Account”.
- Enter the account you want to grant dashboard access (e.g. example@domain.com).
- Select a team from the dropdown menu.
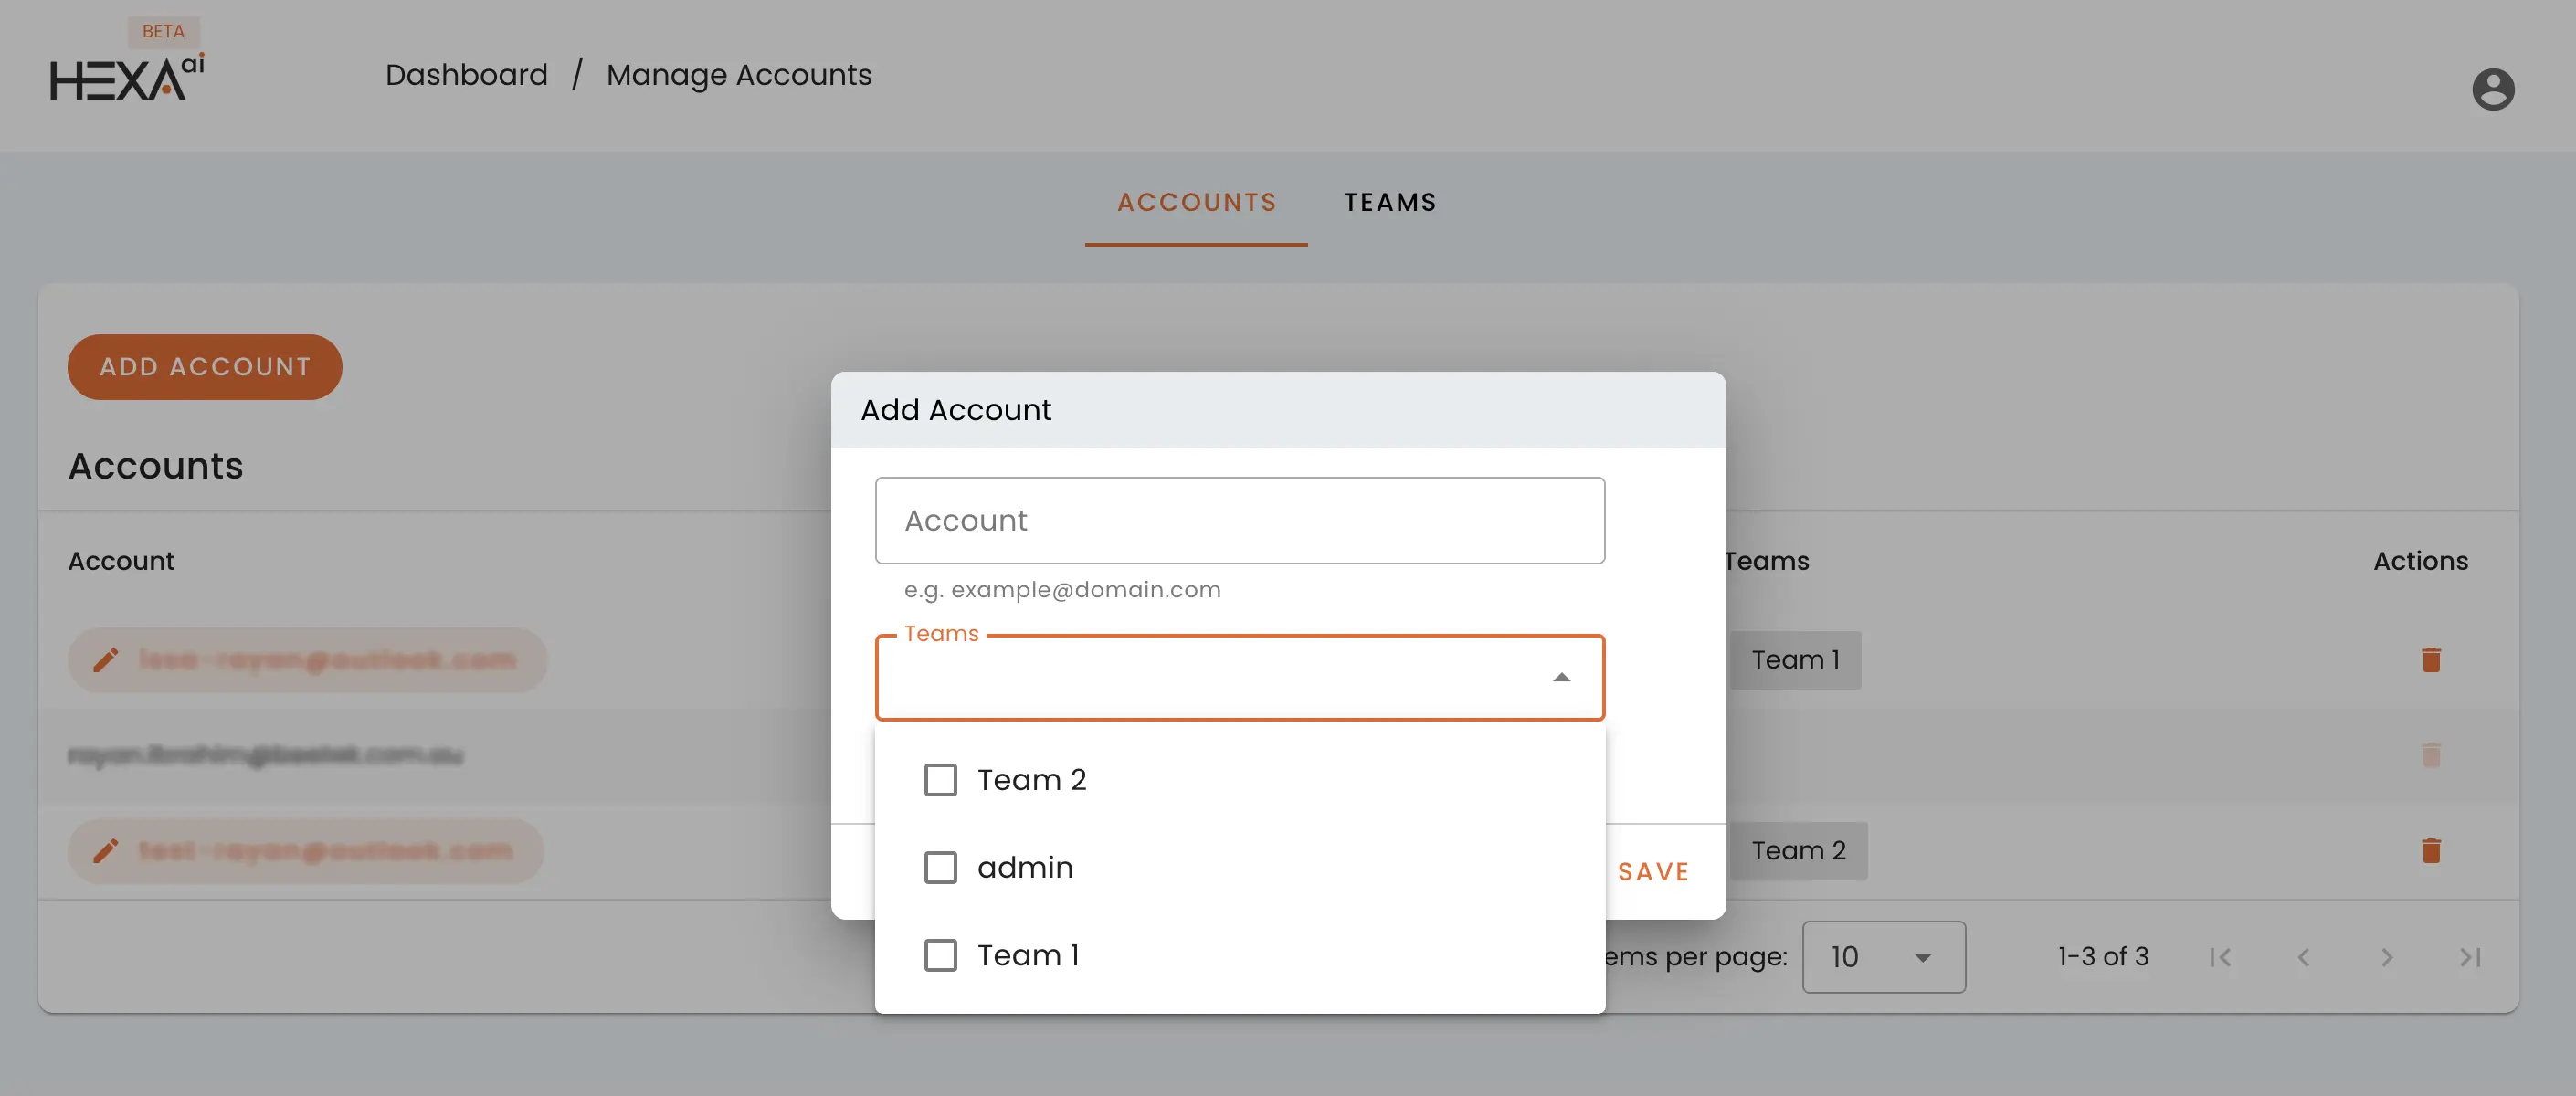
Now, the added accounts will have access to your dashboard based on their associated team and assigned media tag.